
It’s the most popular trail in the park – and arguably the most beautiful. The Skyline Trail Mt Rainier will blow you away! It’s the best way to see the park’s most prominent feature up close – the gorgeous Mount Rainer.

This post may contain affiliate links. For more info, see my disclosures.
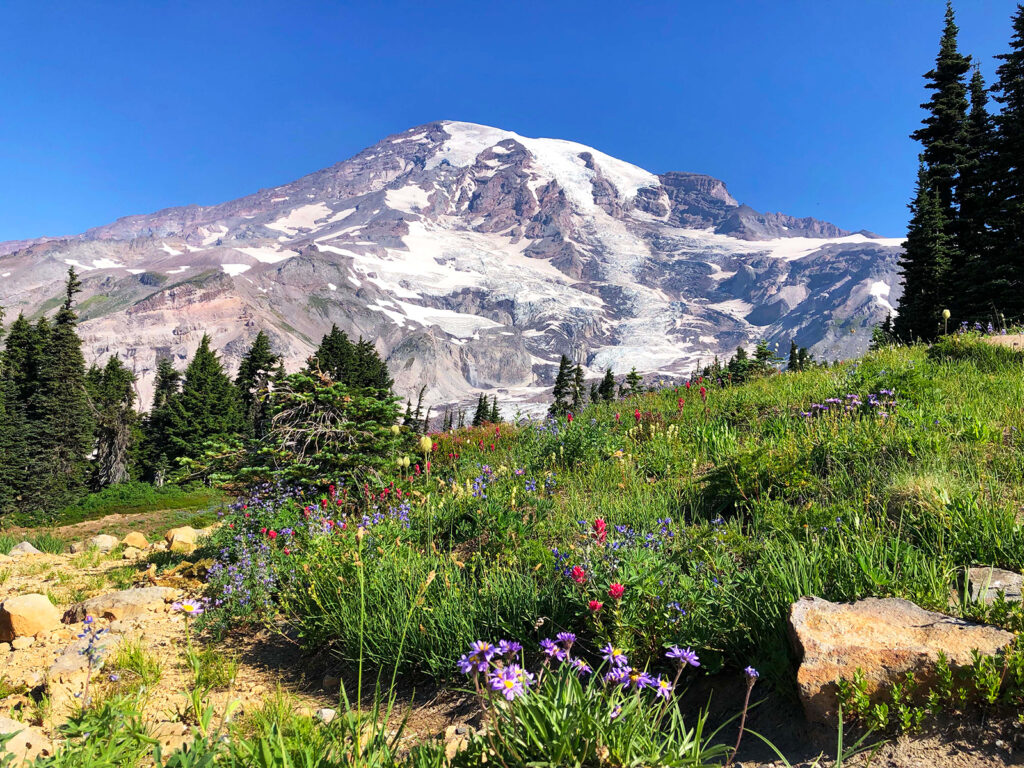
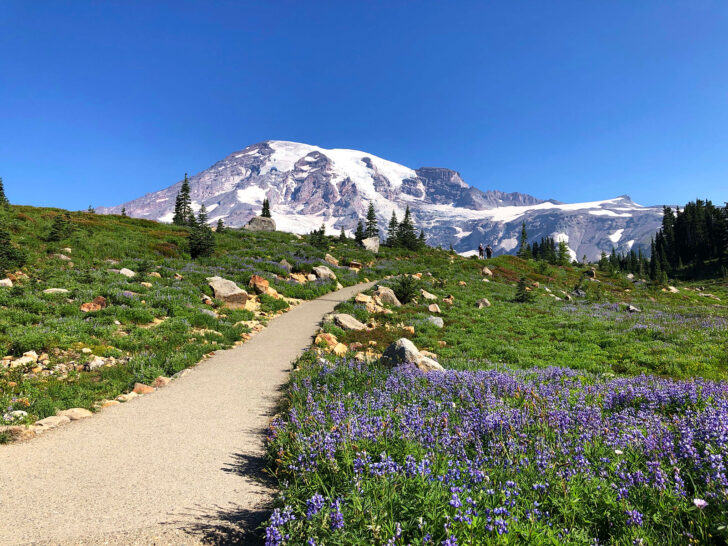
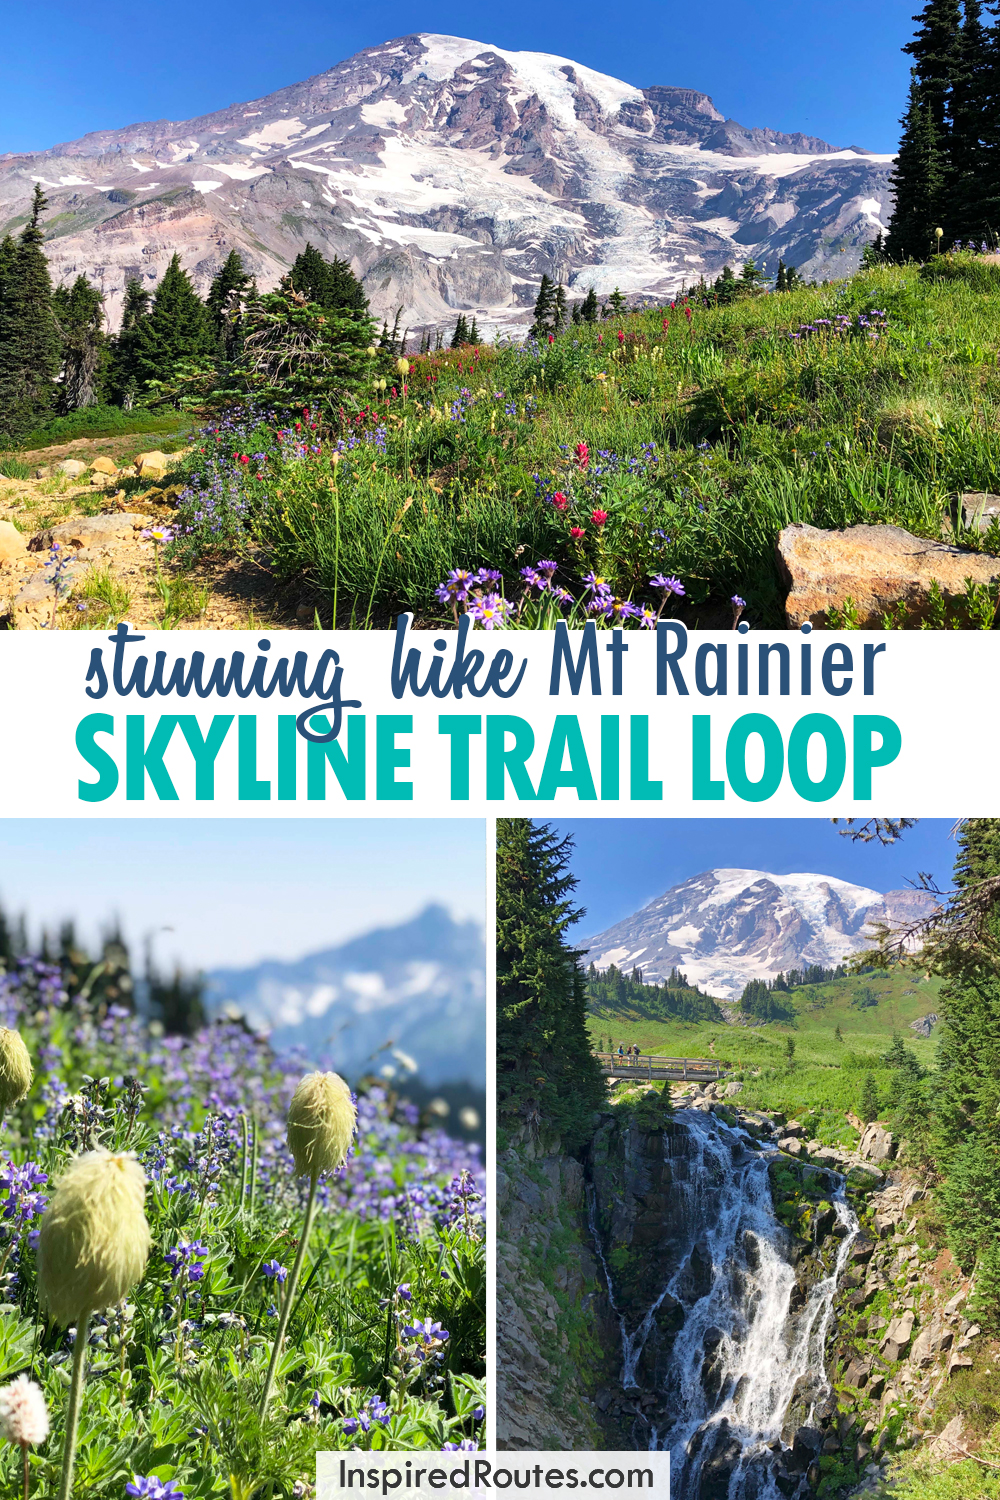
The Skyline Trail boasts stunning wildflowers in the summer and amazing views of the Cascade Mountain range. Crowds flock to the trailhead to see the famous Myrtle Falls, Panorama Point and views from High Skyline Trail.
If you’re looking for the best hike in Mount Rainier National Park – and dare I say even the whole state of Washington – you’ve just found it! Here’s your guide to everything you need to know about the Skyline Trail Mount Rainier.

Skyline Loop via High Skyline Trail quick facts
- 5.5 miles
- 1700+ feet elevation gain
- Average hiking time: 4.5 hours
- Rating: moderately strenuous
- Dogs are not allowed
Keep reading for trail variations! There are ways to do this hike to get amazing views without as much time or effort.
Must-watch video: Paradise Mount Rainier, including Skyline Trail Loop
Ultimate guide to Skyline Trail Mt Rainier
This post is going to cover a lot! Here’s what to expect:
- Location of the trail
- Directions to the trailhead
- Map of Skyline and Paradise trails
- Skyline Trail options (shorter and longer variations)
- Best time to hike the trail
- Tips to maximize your experience, including which direction to hike the loop
- What to pack for hiking the Skyline Loop Trail
- Exactly what to expect while hiking, including the trail’s most prominent features like Panorama Point Mt Rainier
- Quick summary of the 1-mile hike of Skyline Trail to Myrtle Falls
- What to do near Skyline Trail and Jackson Visitor Center
Okay, let’s dive in!
Where is the Skyline Trail?

Located on the southern side within Paradise Mt Rainier, the Skyline Trail starts at the Jackson Visitor Center. The national park is divided into 5 areas:
- Carbon & Mowich (northwest)
- Sunrise/White River (northeast)
- Ohanapecosh (southeast, also known as Stevens Canyon)
- Longmire (southwest)
- Paradise (also considered southwest but it’s directly south of the mountain)
If you’re a visual person (like I am) the Paradise icon is on the map below. It’s the orange marker in the center of the map. That’s where Skyline Trail starts!
Directions to the trailhead
You can access the Skyline Trail Mt Rainier through the southwest entrance (Nisqually) or southeast entrance (Ohanapecosh/ Stevens Canyon). You’ll drive more than 30 minutes towards the center of the park from either entrance to the Paradise section of the park.
Pro tip: download an offline version of Google Maps that will get you from the starting point of your day to the Henry M. Jackson Memorial (Paradise) Visitor Center. There’s very little reception anywhere in the park.
The limited cell service is common in many parks, and reminds me of my time in Glacier National Park in Montana, where I practically went days on end without any service.
Use a two-way satellite communicator while hiking in Mt Rainier National Park, and any other placer that matter! It allows you to call for help in an emergency when there’s no cell phone service.
I can’t tell you how many people over the years I’ve seen injured on hiking trails. This Garmin inReach Mini has come on the Navajo Loop & Queens Garden Trail in Bryce Canyon, Laurel Falls Smoky Mountains, and so many more hikes!

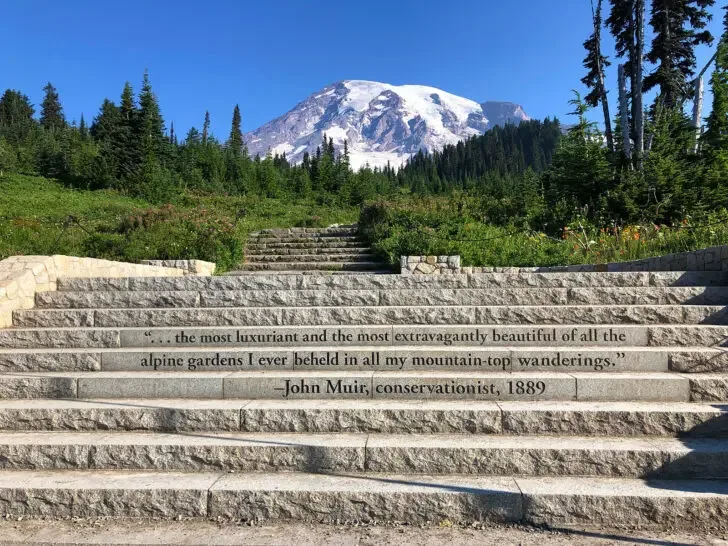
Once you’re at the visitor center parking lot, the trailhead is fairly obvious….look for the large steps heading toward the mountain!
Map of Skyline Trail Mount Rainier
There are multiple ways to walk this amazing trail. You can do the whole loop – what this guide will walk you through – or just sections of the trail. Keep reading for the best paths to take and how long each will take you.
Pro tip: grab a map from the visitor information center display, or find a park ranger nearby if you’re there before it opens. Having this on the trail is incredibly helpful!


How long is the Skyline Trail in Mount Rainier National Park?
The full Skyline Trail Loop is 5.5 miles according to the National Park Service. Although popular hiking trail tracking apps and websites commonly show longer distances of over 6 miles, or even 6.4 miles.
Also noteworthy, Alltrails has this hike rated as moderate but the NPS has it as a strenuous trail. As someone who’s conquered the trail, I agree with the park that’s it’s quite difficult.
Coming in at an average hike time of 4.5 hours for the whole loop, be sure to prepare adequately with the right gear, food and water to hike the whole thing. (Keep reading for more on recommended gear.)
Skyline Trail from the trailhead to Myrtle Falls is 1.0 mile round trip.More details on this short hike later!

Skyline hiking trail options
This is the most popular trail in the park – and for good reason! There’s so many variations to hike this gorgeous trail. Here are a few options based on skill level and how much time you have.
- 5.5 miles: the whole Mt Rainier Skyline Trail Loop from the Visitor’s Center to the Panorama Point and back around.
- 4 miles: hiking the Skyline Loop Trail clockwise, but taking the Golden Gate Trail as a shortcut.
- 5.7 miles: Skyline Loop plus Deadhorse Creek Trail and Glacier Vista– for the best views!
- 1.0 mile: Skyline Trail to Myrtle Falls and back.
- 5.8 miles: Starting at the trailhead and immediately going left on the Avalanche Lily Trail, joining the Waterfall Trail then joining the Deadhorse Creek Trail before seeing Panorama Point and looping back around and down the Skyline Trail.
Best time to hike Mt Rainier Skyline Trail
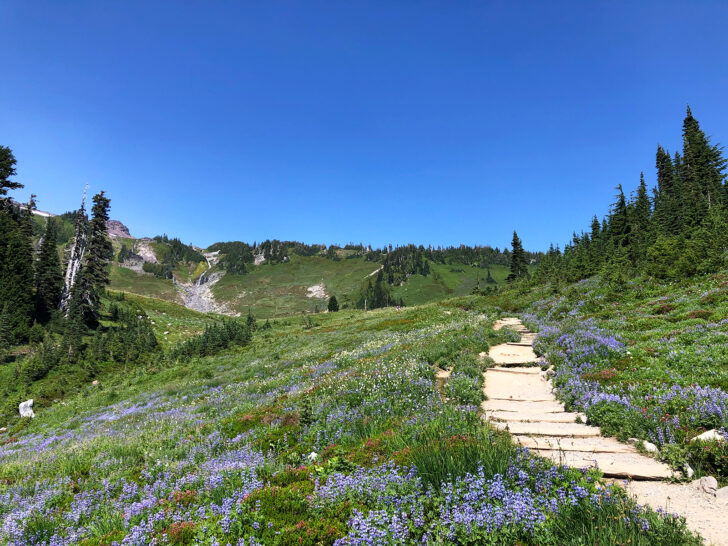

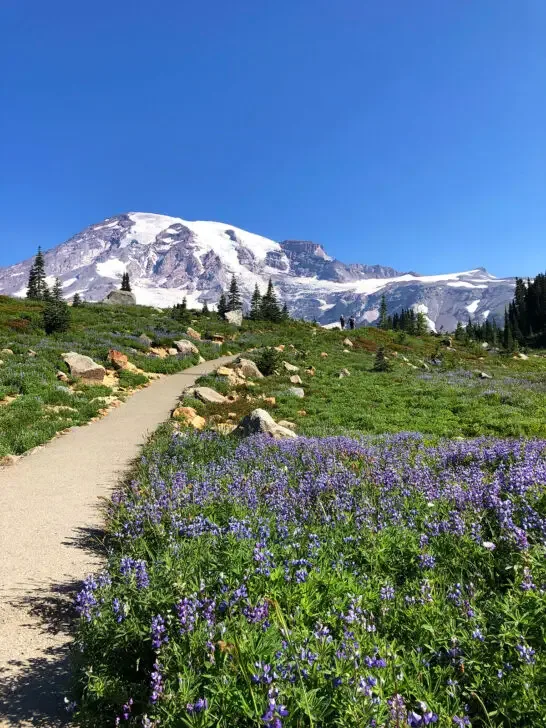
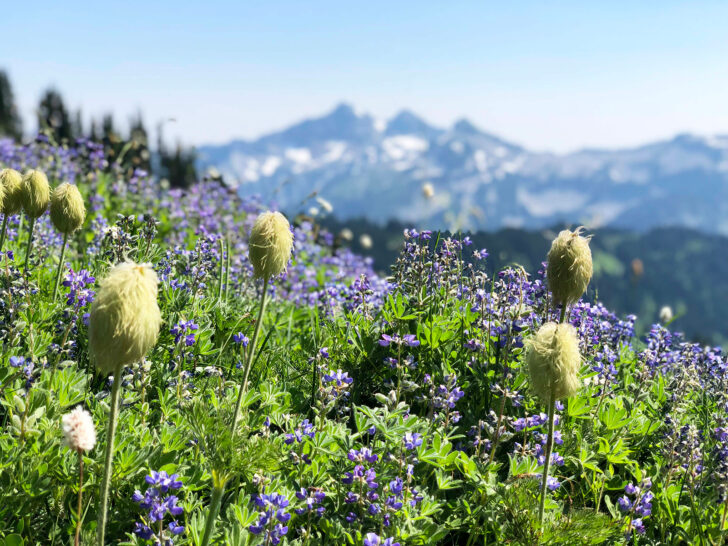
The best time to hike the Rainier Skyline Trail is July through September. You’ll see the warmest weather and best hiking conditions. In addition, the wildflowers are stunning in July and August!
Most people hike the trail in the summer months. Because it’s most popular in the peak summer travel season, I strongly recommend hiking during the week and avoiding weekends in the park. This park is very busy in the summer months!
In addition, arrive at the Jackson Visitor Center parking lot by 8:00am to secure a parking space. Overflow parking is available down the road but it will add .25 to .5 miles each direction to your hike.
Considering there’s typically snow on the ground for 9 months of the year at this elevation, it’s generally the easiest to hike without snow. If you’re hiking the Skyline Trail October – June, be prepared for snowy hiking or snowshoeing conditions.
The Paradise section of Mt Rainier National Park is open all year round. However not all road are maintained so check the official NPS site for road conditions if traveling anytime other than summer. Also be sure to check trail conditions so you’re fully prepared.
Tips for hiking Skyline Trail Mt Rainier

These are a few of the best tips for hiking this epic trail!
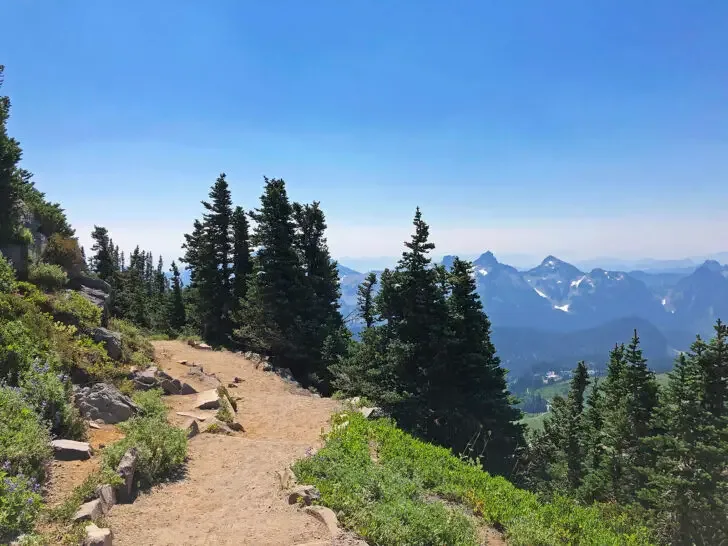
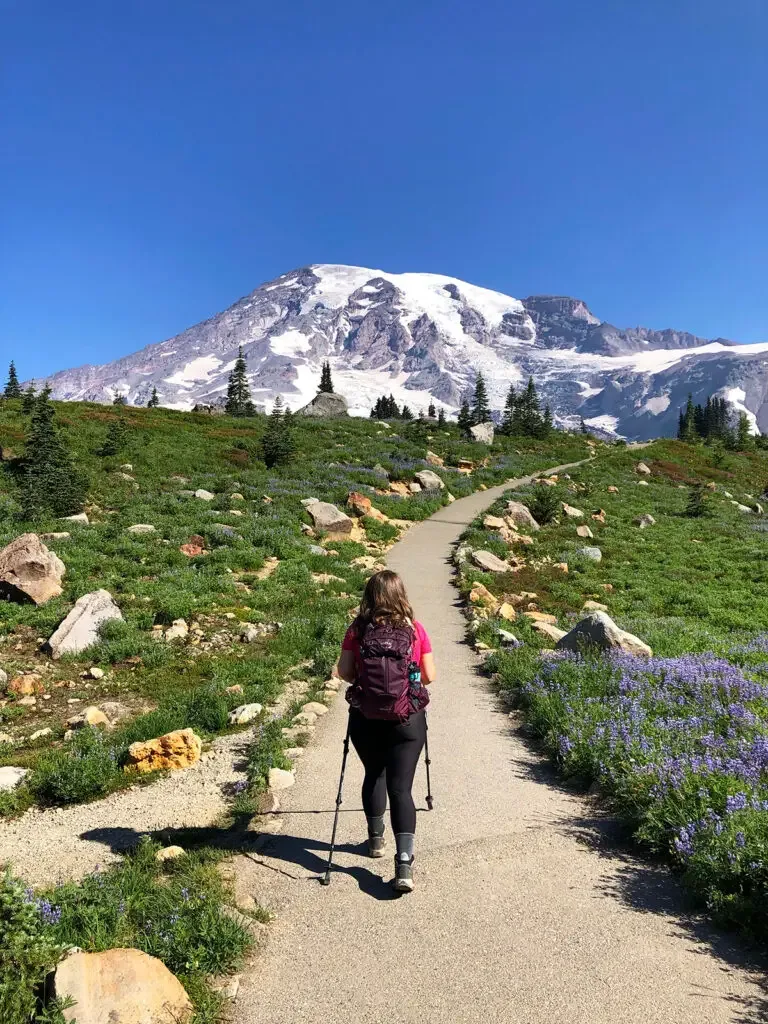
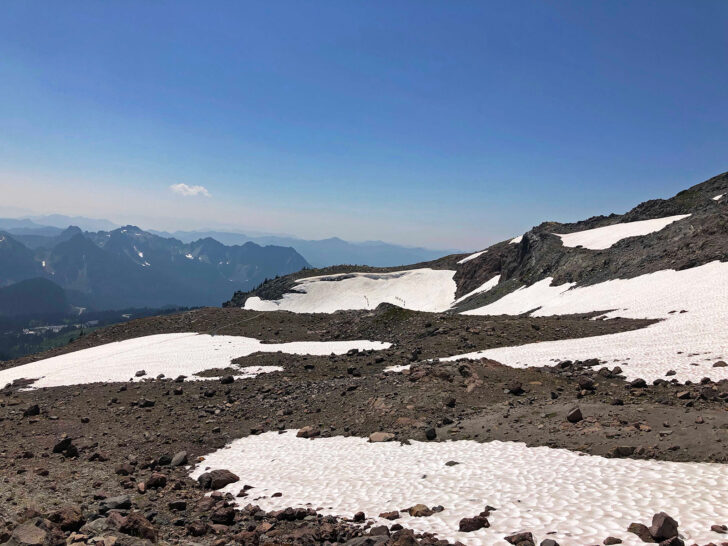
1. Go clockwise!
If you’re hiking the full Skyline Trail Loop, the best views of the mountain are by doing the loop clockwise. Furthermore, the decline is easier in the clockwise direction.
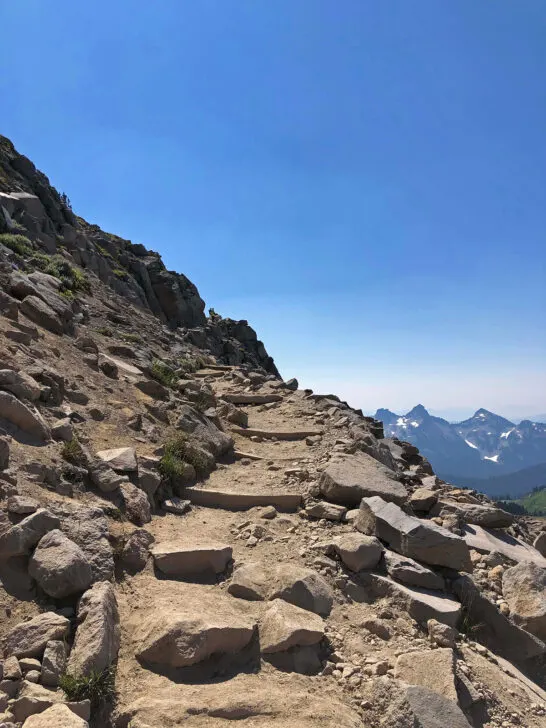
For instance, this photo is coming up the trail in a clockwise position….

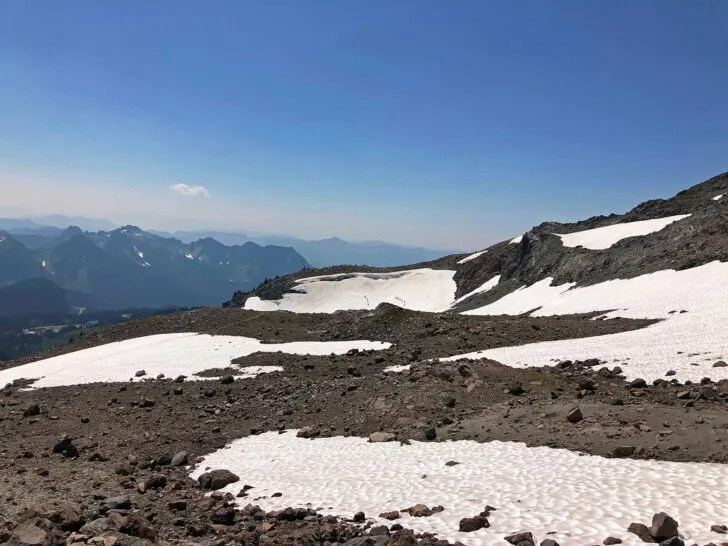
And this is hiking the trail counterclockwise. The trail eventually disappears behind the mountain you’re climbing and re-appears as you reach the summit.
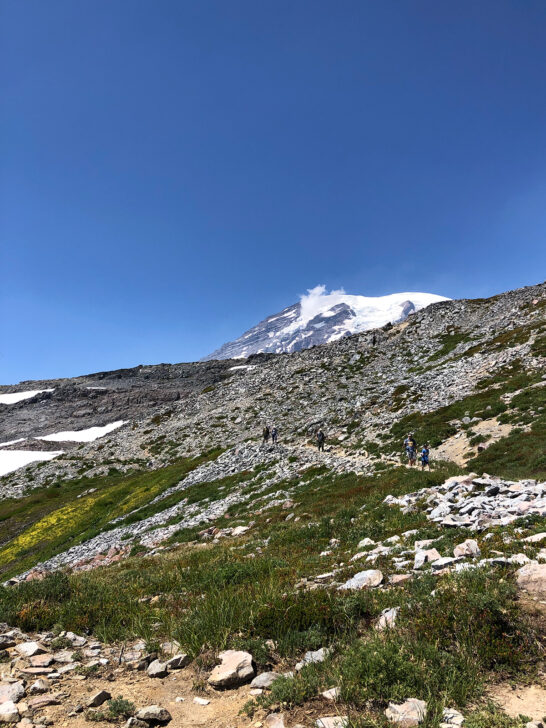
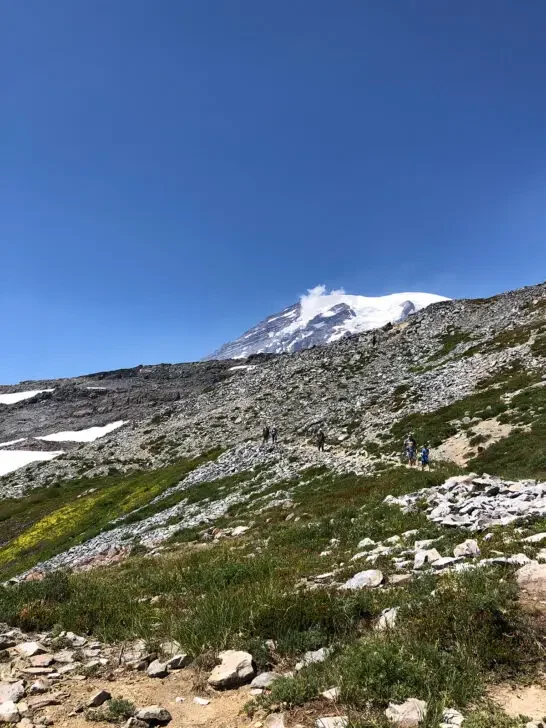
When hiking the Skyline Trail clockwise, you’ll encounter a steeper climb and a more gradual decent.
Clockwise also allows you to add the Deadhorse Creek and Glacier Vistas for the best views while facing the mountain. Or cut your hike down by taking the Golden Gate Trail – it’s much steeper and strenuous than the Skyline Trail in the counter-clockwise position.
2. Expect wildlife on Skyline Trail Mt Rainier

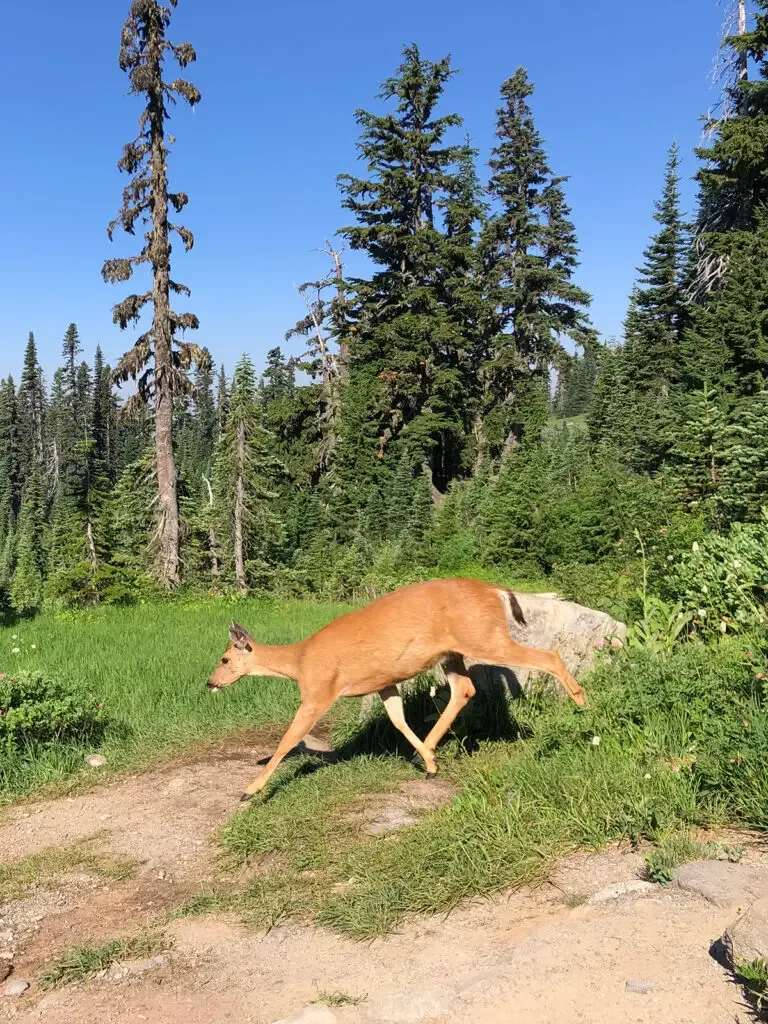

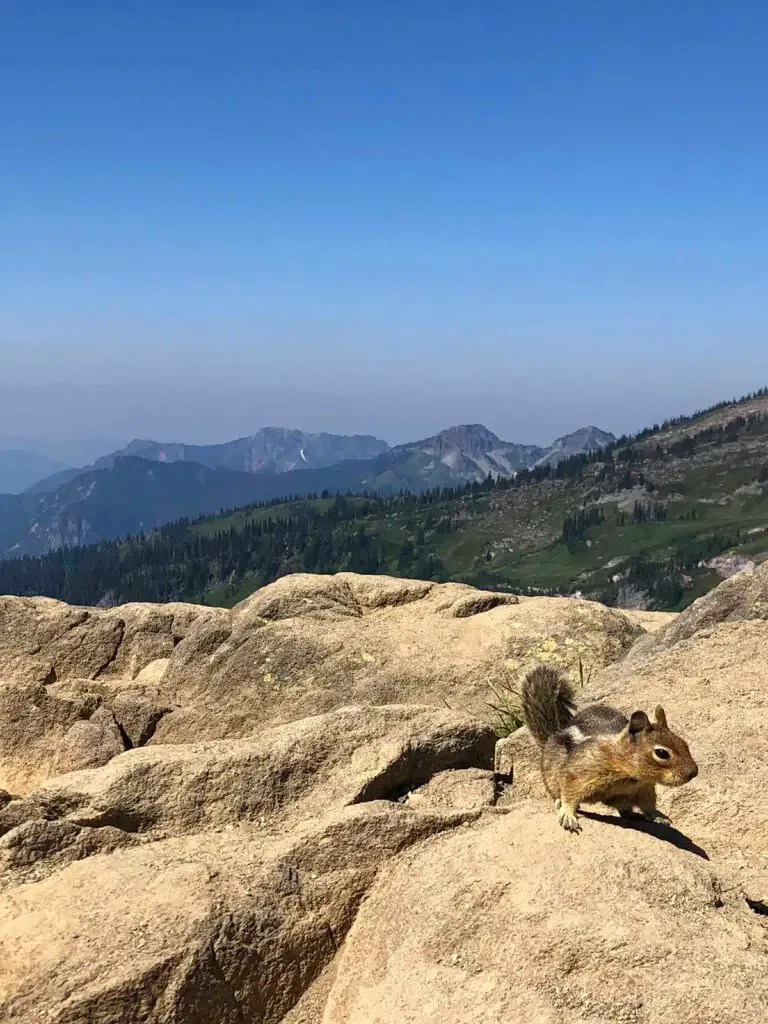
Deer, mountain goats, bear, marmots, chipmunks and birds are just a few of the species often seen on the trail.
It’s rare to see a bear, but it is possible! Each adult should have bear spray easily accessible just in case. This is the bear spray I use, but just know if you’re flying into the area, you cannot take bear spray on airplanes. So buy it once you arrive.
Pro tip: try purchasing bear spray in advance and schedule it for pick-up after you land in Seattle or Portland. I struggled to find it locally. And of course, if you’re driving to the park, buy bear spray online and pack it with you.
3. Mount Rainier wildflower season
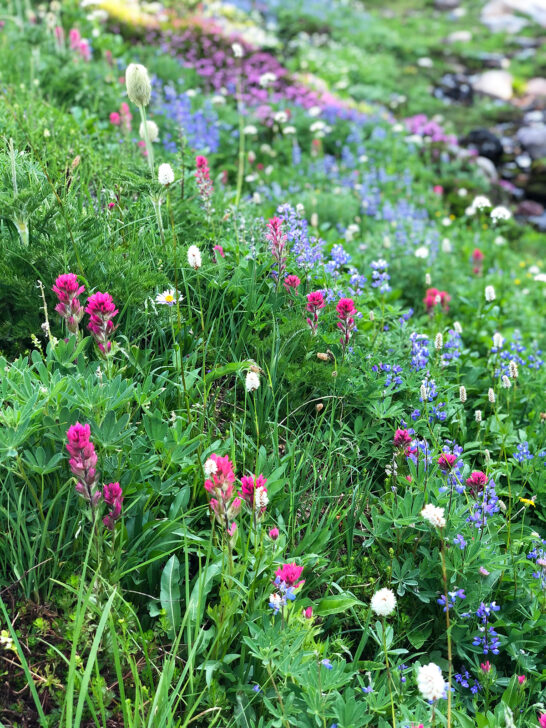

If at all possible, I’d highly recommend hiking the Mount Rainier Skyline Trail during wildflower season. It’s truly incredible!
The wildflowers generally peak in the last week in July and the first week in August in Mount Rainier National Park. When I booked a trip the first week of August then discovered I’d be visiting during peak season, I didn’t know what I was in for. Such a delightful surprise!
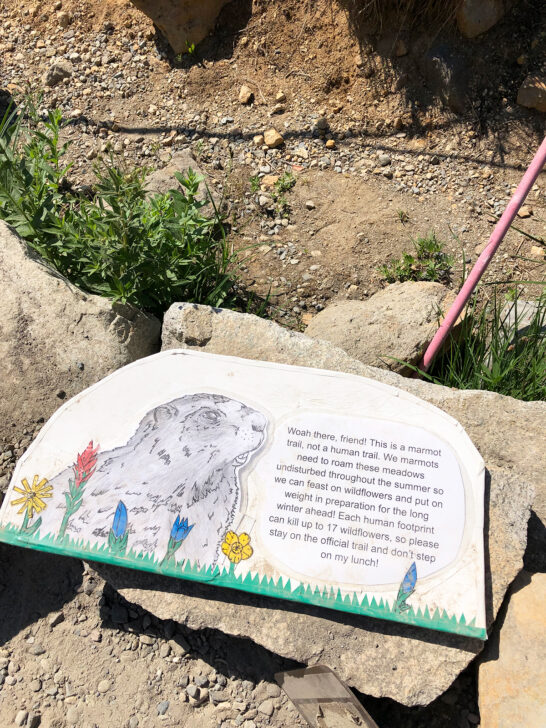
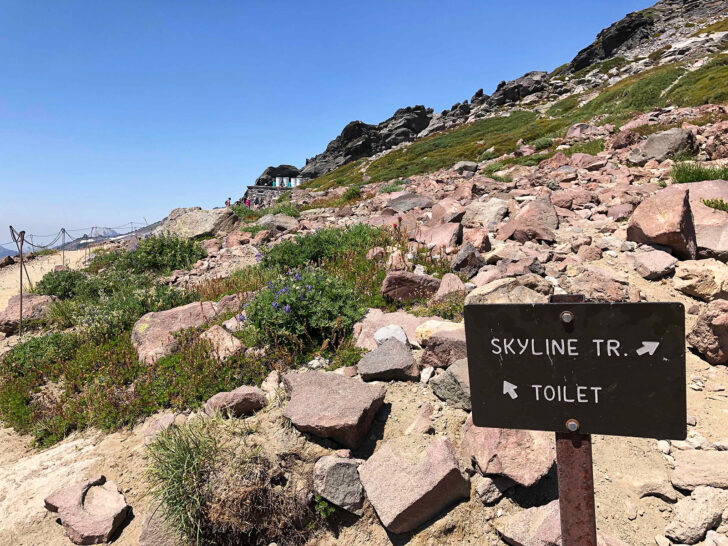
4. Stay on the trail
Don’t step off – even to take photos. Be considerate of the fragile ecosystem and stay on the trail at all times.
While hiking the trail near Myrtle Falls, I saw a group of people who wandered pretty far off the trail, maybe 30-40 feet. They were stacking rocks and taking photos until they were scolded by a park ranger.
It’s so incredibly important to stick to the trail because the species that live in the park depend on every resource there. I even saw this sign…

5. Leave no trace
The simple leave no trace principles are all about respecting the environment and recreating outdoors responsibly. So leave what you see and pack in what you pack out. Even compostable items like apple cores and orange peels need to be packed back out with you.
What to pack for Mount Rainier Skyline Trail

If you’re new to hiking or haven’t done a longer day hike, then this section is for you. Here are the 8 things to pack specifically to hike the Skyline Trail Mt Rainier:
1. Good hiking boots with traction
If you’re hiking the full trail, hiking boots with traction are a must! These are the hiking boots I wore on the trail (and while hiking in places like Zion with kids and the best Colorado hiking trails) and I love them!
If you’re planning to hike just to Myrtle Falls, then any type of athletic shoe will work, as you’ll be on pavement most of that time.
Because of the steep inclines and declines, I’d recommend ankle support too. These are the hiking boots I wore on the Mt Rainier Skyline Trail (and other amazing national parks) and I love them.
Of course, in the winter or during snowy conditions, snow shoes are a must!
2. Trekking poles (essential when hiking Mount Rainier Skyline Trail)
These trekking poles will come in handy to help you distribute the work between your legs and arms. They also assist while climbing up and help you balance as you navigate the downward path.
Because the trail is a mix of concrete, rock, dirt (or mud) and snow, I recommend versatile trekking poles with interchangeable tips. These are the trekking poles I hiked with and they worked perfectly.
3. Hiking backpack

As someone who’s hiked with a proper backpack and without, I can tell you with 100% certainty this hike is easier with a pack that’s designed to be worn for hiking. This is my favorite hiking backpack, and the one I wore on this hike.
You’ll want a proper backpack to help distribute the weight on your body. Choosing one with a rain guard is wise for mountain hiking, considering the weather changes frequently! The Osprey Sirrus was perfect for this hike!
4. Lots of water (super important on the Skyline Trail Mt Rainier)
The average hike time is 4.5 hours for this whole loop. Plan accordingly!
Experts recommend drinking 1/2 liter (17 ounces) of water per hour of hiking. And when you’re hiking in altitude, you should drink more water to avoid dehydration.
I’d recommend at least 3-4 (20 oz) bottles of water per person for this hike. Alternatively, you could fill a water reservoir for your hiking backpack. The 2 liter hydration bladder from Osprey fits perfectly into a hiking backpack!
5. Protein snacks or lunch
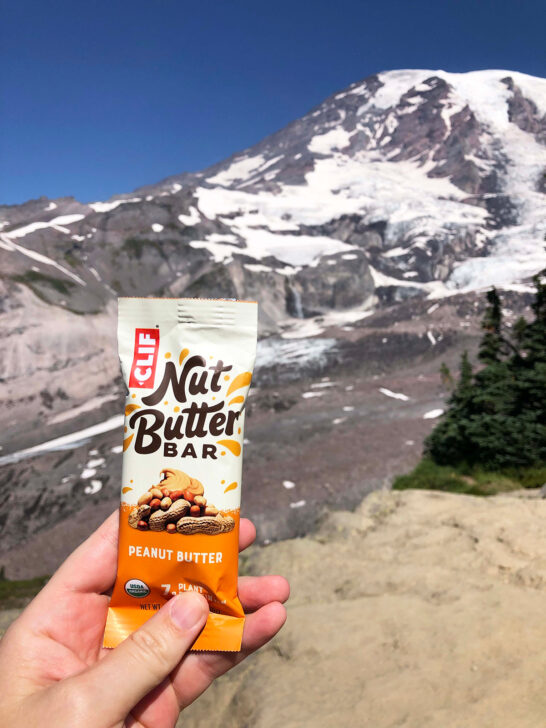

You’ll need energy for this hike! If you get to the trail early in the morning and hike at an average pace, a heavy snack like trail mix or beef jerky might just work out for you. However if you take your time on the trail or get a late start, it’s worth packing lunch.
Great snack and lunch spots are Glacier Vista, Panorama Point or the lookout at the top of High Skyline.
6. Sunblock and sun shade
The sun is powerful at over 5,500 feet in elevation. Remember to re-apply sunscreen and keep your skin covered. And wear a hat to protect your face and scalp!
7. Rain gear
Most of us want gorgeous days for hiking. But it’s been said that Mount Rainier creates her own weather. So just in case, bring rain gear. The weather on the mountain can turn in an instant.
A backpack cover, poncho and rain jacket are just a few of the items to have in case of rain. Here’s the rain jacket I use while hiking. It keeps me dry and comes in a big variety of sizes and colors.
8. Extra layers
The wind on the trail can get gusty, or the sun can warm it up. And of course, the Mt Rainier Skyline Trail gets cold!
Check the weather before you go and even ask the park rangers what to expect before you head out. And of course, bring more layers just in case.
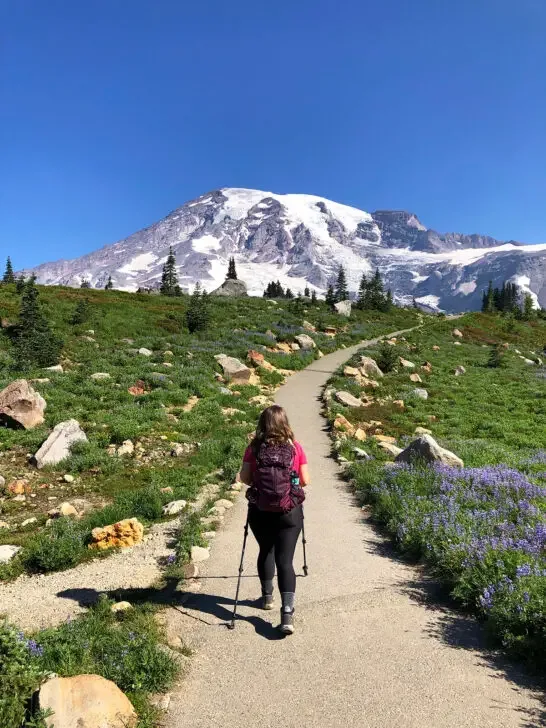
What to expect hiking the Skyline Trail Mt Rainier
Alright already! With the location, tips and what to bring with you all covered, let’s get to what to actually expect on the trail. Next you’ll find the best trail features and the run-down of hiking the Skyline Trail Mt Rainier clockwise.
Excited? Okay! Let’s do this!


Note: this section of the post is a detailed description specific to hiking the Skyline Trail Loop.
Beginning the best trail in Mount Rainier
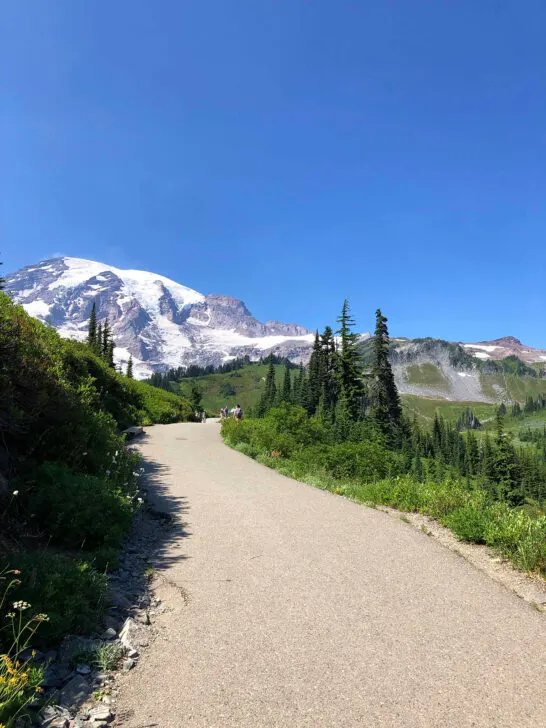
The trail starts off steep and is paved. If you have hiking poles with interchangeable tips (highly recommended!), definitely start off with the rock/concrete attachments.
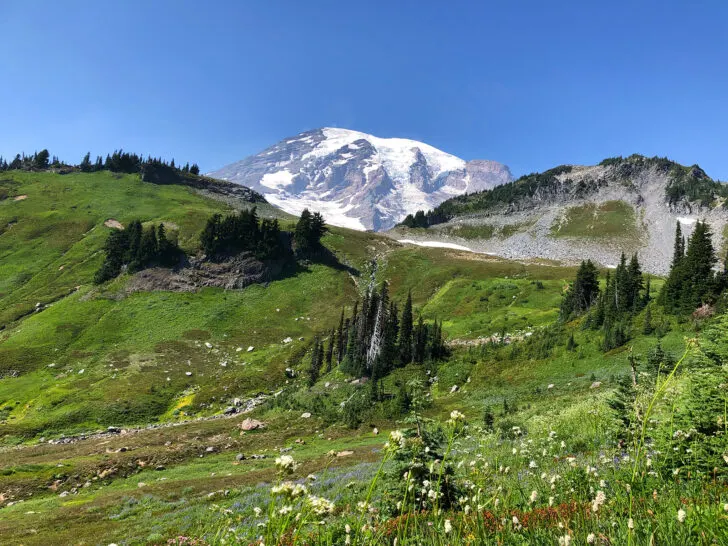
Wildflowers are abundant and beautiful on this trail! It reminds me of hiking the best trails in Glacier National Park and specifically the Hidden Lake Trail – gorgeous!
In just the first 1/2 mile, I saw many people stopping and wondering if it’s worth it. The answer is YES! With the steep grade, just take breaks as needed and don’t try to e a super hero. Do what you can and enjoy yourself.
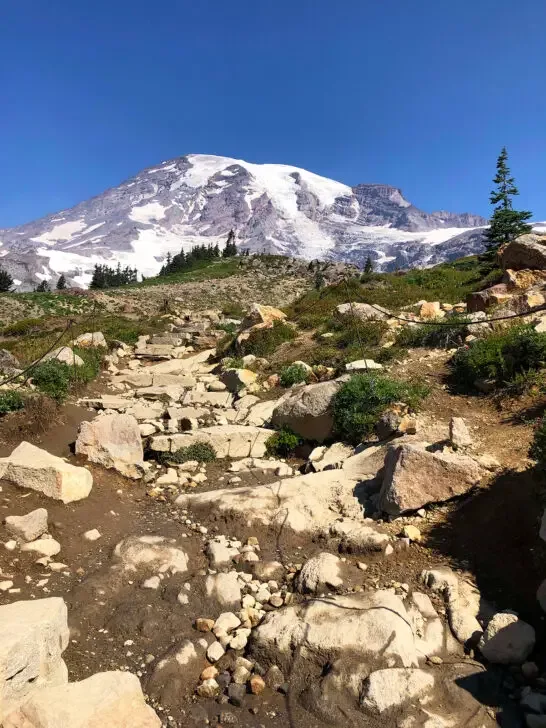
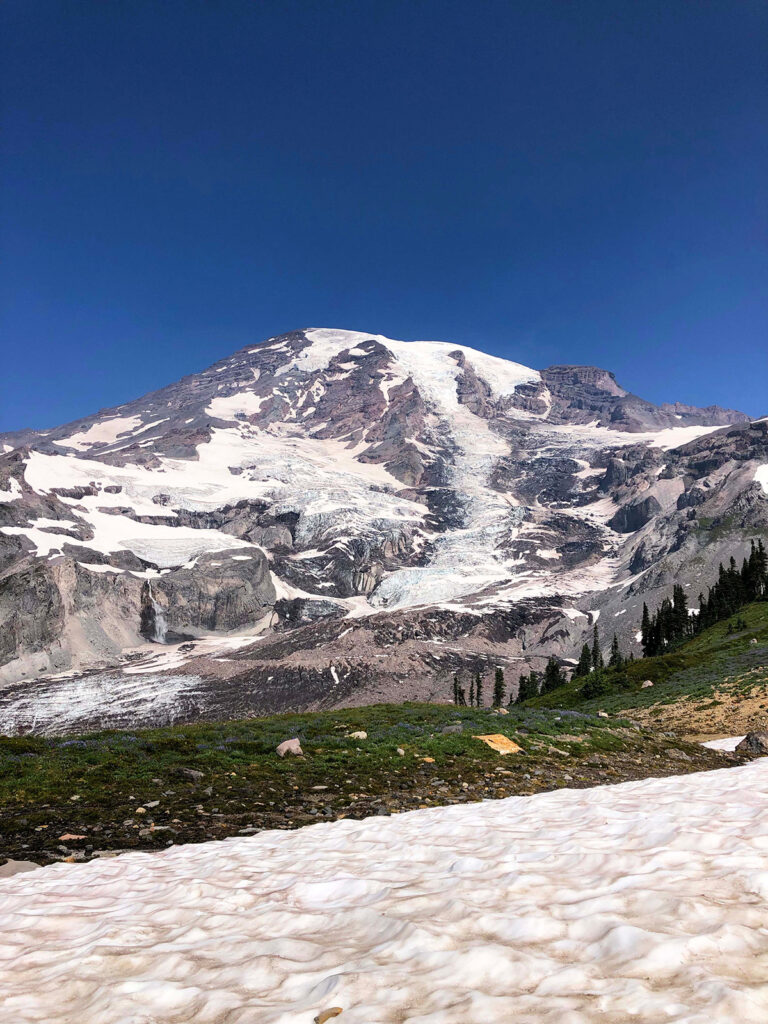
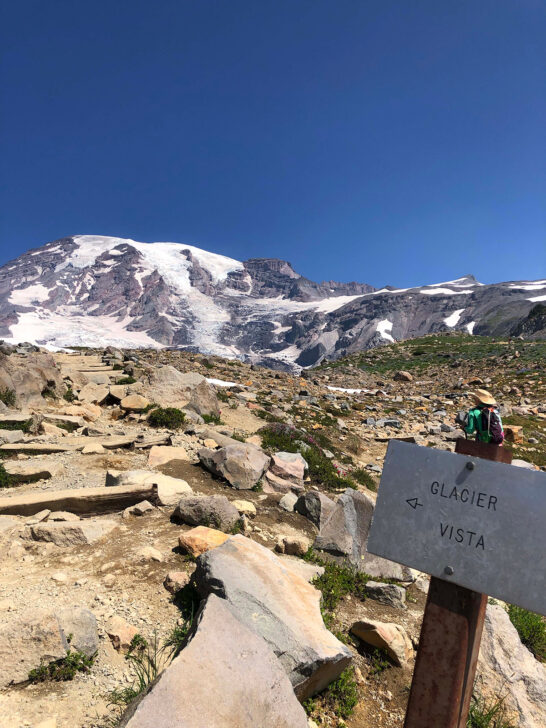
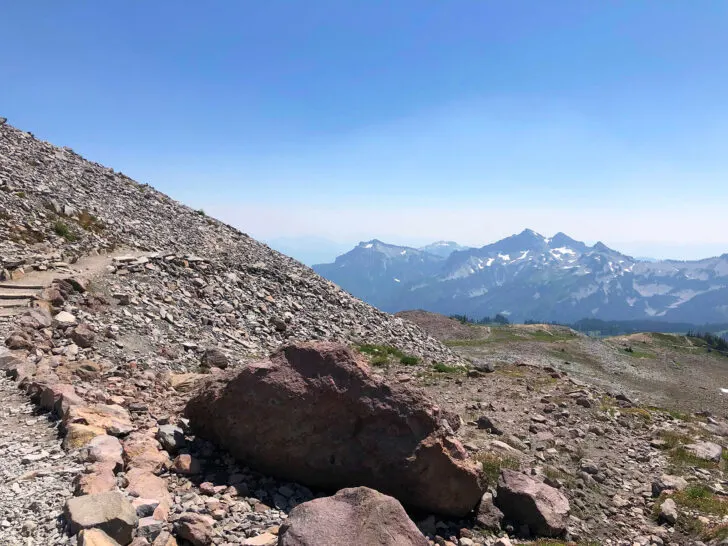
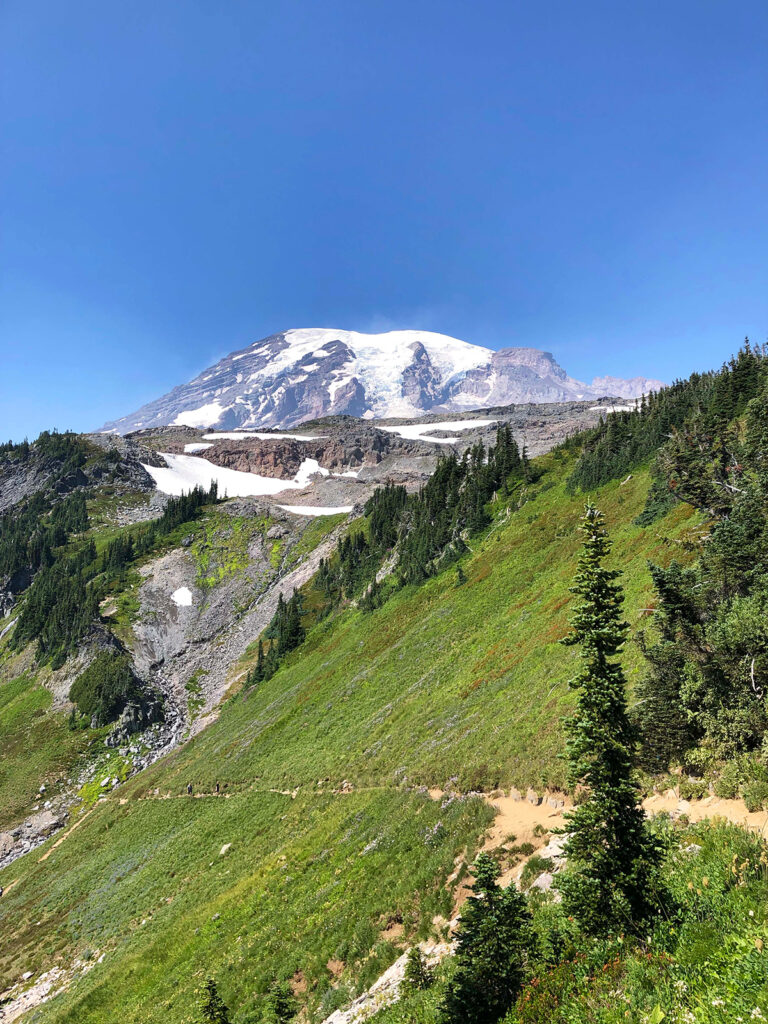
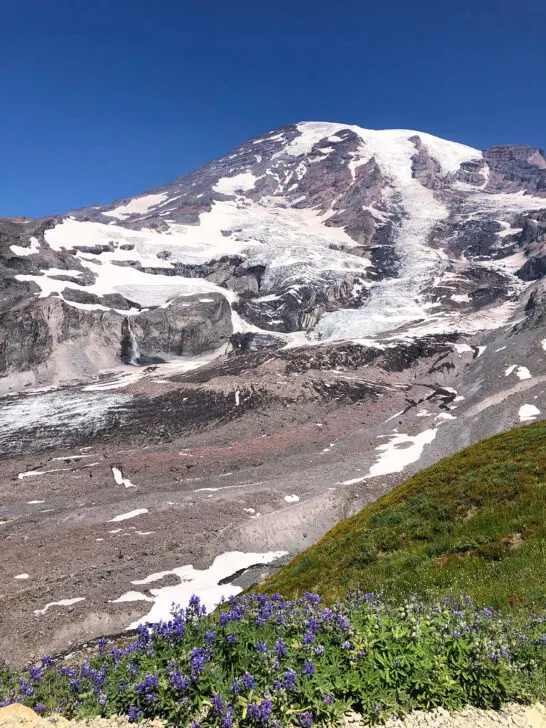
Best Views – Skyline Trail Mount Rainier (Deadhorse Creek & Glacier Vista)

For the absolute best views of the mountain as you’re hiking (remember you’re going clockwise around the loop), as you approach the 0.5 mile mark, stay left to take the Deadhorse Creek Trail. It adds .2 to the total hiking distance, but it gets you closer to the mountain than sticking to the Skyline hiking trail.
You’ll hike past gorgeous meadows with unbelievable views! Stop to smell the flowers – just be sure to stay on the trail.
Once you’re back on the Mount Rainier Skyline Trail, the path really starts to get steep. This is also an advantage of hiking this clockwise – the opposite direction has steeper steps down, which many people find more challenging.
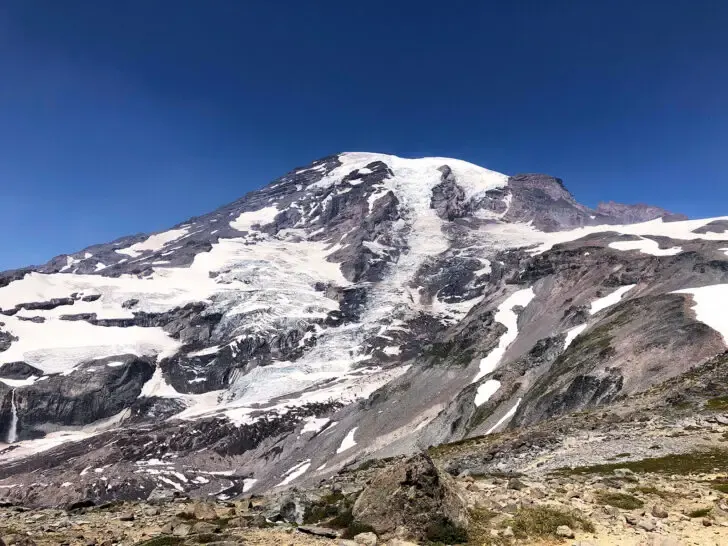
You’ll hike this trail for just a short period, then I’d highly recommend to hop over to the Glacier Vista to get as close to the mountain as possible. You’ll get an amazing view of the valley and the Nisqually Glacier.

From this point, take a moment to soak in the fact that you’re so close to the mountain. Only the valley is separating you and Mount Rainier. It’s incredible!
The Glacier Vista doesn’t add any more to your total miles, so it’s worth it. Then hop back on the main trail and continue climbing up the mountain.
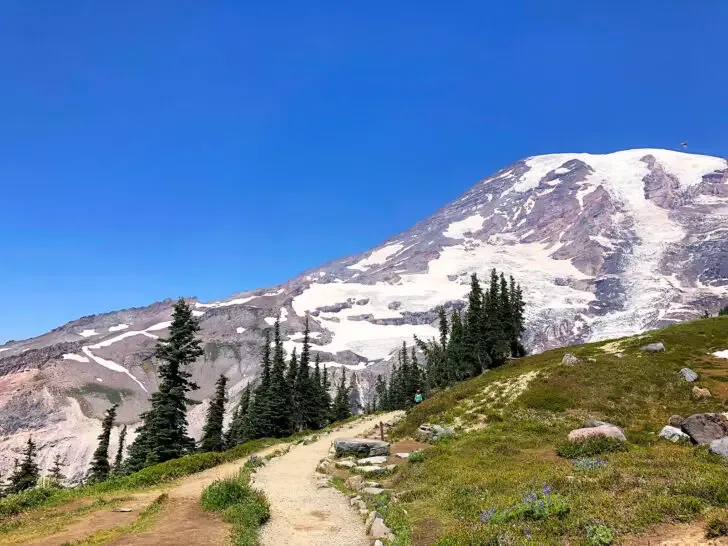
Expect snow

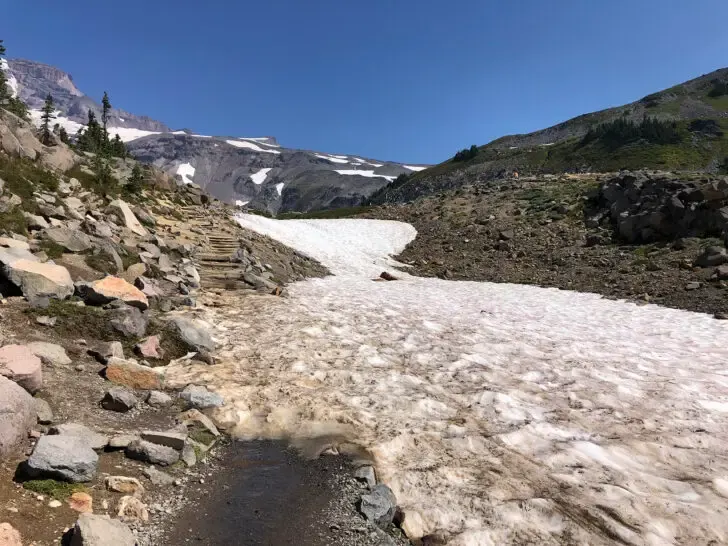
For most of the year, you should expect to see some snow. You’re at 6000-7000 feet in elevation so snow is common. After all, the average snowfall in Mt Rainier National Park is 639 inches per year!
As enticing as the snow looks, be sure not to hop off the trail to touch it – unless the trail is snow-packed, of course!
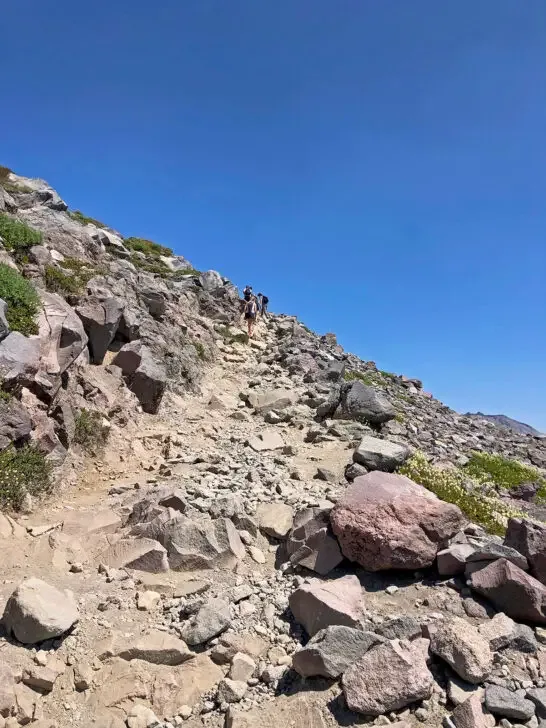
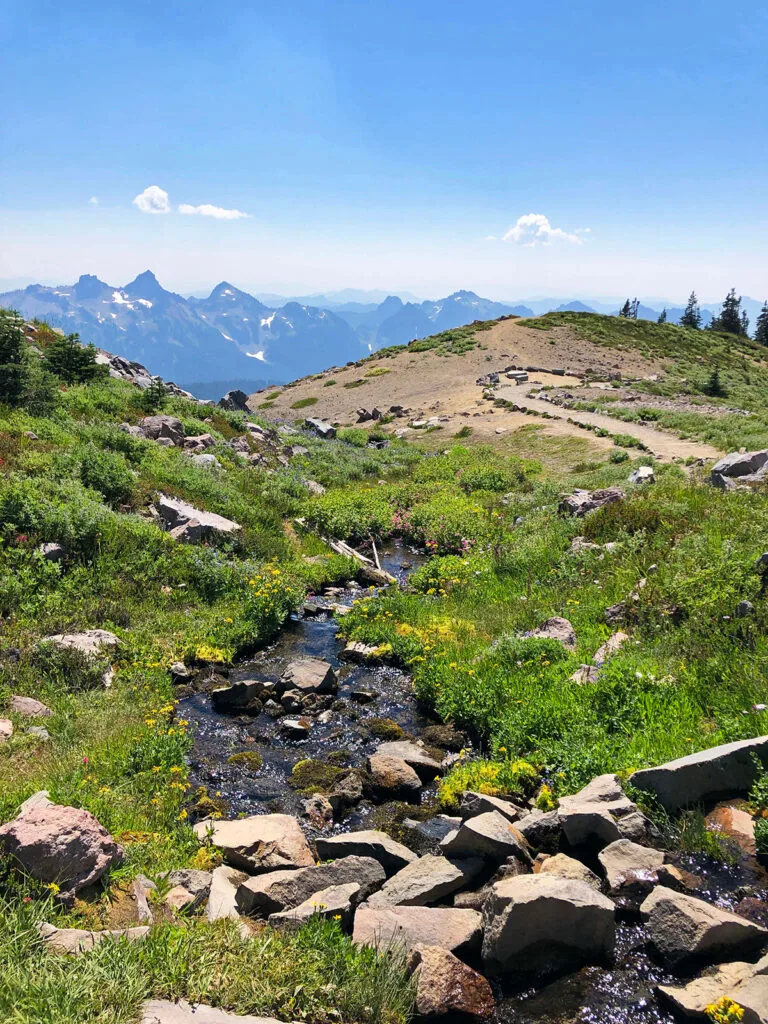
From here the incline really starts to get steep and is more challenging. Just remember – once you’re half way, you get to descend and that feels glorious. 🙂
Panorama Point Mt Rainier
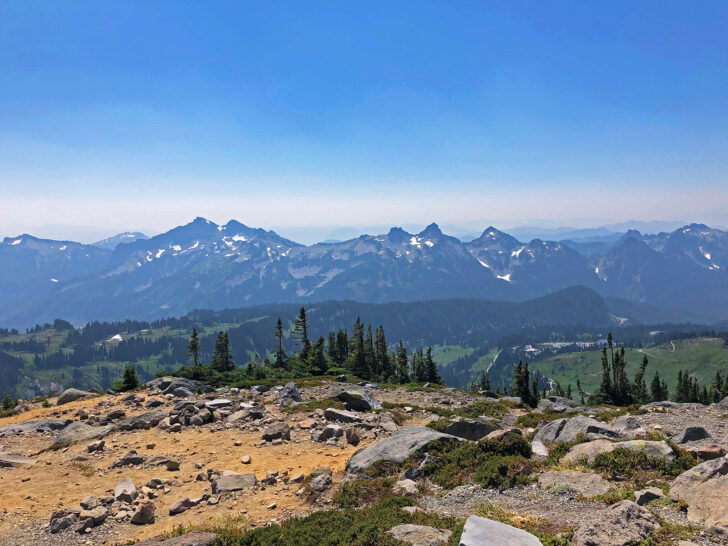
One of the coolest parts of Skyline Trail is Panorama Point. By this time, you’re pretty close to the highest part of the trail at 6,800 feet, and it’s a good stopping point. Perfect if you packed a snack or lunch. Grab a seat and enjoy the view!
On a clear day, you can see Mount Saint Helens in southern Washington and even Mount Hood in Oregon from Panorama Point. The day I hiked it was hazy so we could see Mt Saint Helens but just barely. However, the best part of sitting at Panorama Point is viewing the multiple sets of mountains in the distance!
It’s spectacular and worth stopping to catch your breath, take some photos and take a break.
It’s giving me chills thinking about it! I get the same reaction when I think of seeing the NaPali Coast on Kauai when hiking the Kalalau Trail. So stunning!
Bathroom at Panorama Point Rainier

The one and only restroom on the trail is located here. On sunny days or during peak season, be prepared to wait in line a bit. And if you’re one of the only ones there, make sure to lock the door from the exterior when leaving so animals don’t make it inside.
Getting to the top of the Skyline Trail Mt Rainier
After leaving Panorama Point, you’ll climb more vertical than ever. This is the fun part, right?

You’ll see a sign that says High Skyline and you’ll want to take that route towards Paradise and the trailhead. By the way, if you’re wondering if there’s a low Skyline – there’s not! 🤪
Continue working your way up the trail for .29 more and 300 feet more, and you’re there!
Once at the top you can pretty much kiss the mountain! The only thing between you and Mount Rainier is Nisqually Glacier. The air is thin, but you’ll be so proud you climbed the mountain.
There’s a small viewing area at the very top of the trail. This is also a good spot to grab a snack or re-apply sunscreen.

Optional Camp Muir
From here, we could barely make out Camp Muir towards the top of the mountain. Only for the most advanced hikers, Camp Muir is a climb gains 4,788 feet from the Skyline Trailhead, and sits at 10,188 elevation. The entire trail is 9 miles round trip.
It’s the highest you can go on Mt Rainier without a climbing permit. The last 2.2 miles are through the snow, and only those who have physically trained attempt this hike. At the top of the High Skyline Trail starts Pebble Creek Trail and the trek up to Camp Muir, or Cloud Camp, as it was originally called.
Making it to Camp Muir (and beyond) is a bucket-list item for avid hikers. But the rest of us will be completely satisfied with the gorgeous views of the High Skyline Loop Trial. 🙂
Hiking down the best trail in Mount Rainier National Park
From the top working clockwise, the trail is not quite as scenic for the next mile. You’ll be walking on large lava rock, which sort of reminds me of the inside of the Haleakala Crater in Maui.
Since you’re way above the tree line, you’ll continue to see patches of snow. And other hikers saying “are we almost there?” because you know their thighs and lungs are burning!

Pro tip: lean into your hiking poles on the way down to steady your step. The downhill can be tough on joints.
As you approach the tree line things get a little more scenic again, with fun wildflowers popping back up.
Optional: Golden Gate Trail Mount Rainier
If you’re short on time or are getting tired, you can shave off about 1.5 of the 5.5 mile loop hike by taking the Golden Gate Trail. It’s a sharper decline than sticking to the Skyline Trial Mount Rainier. However, the path you’re walking is dirt instead of rock so it’s easier than the portion you’ve just hiked.


Taking both the full Skyline Loop Trail and this shortcut result in beautiful wildflowers!
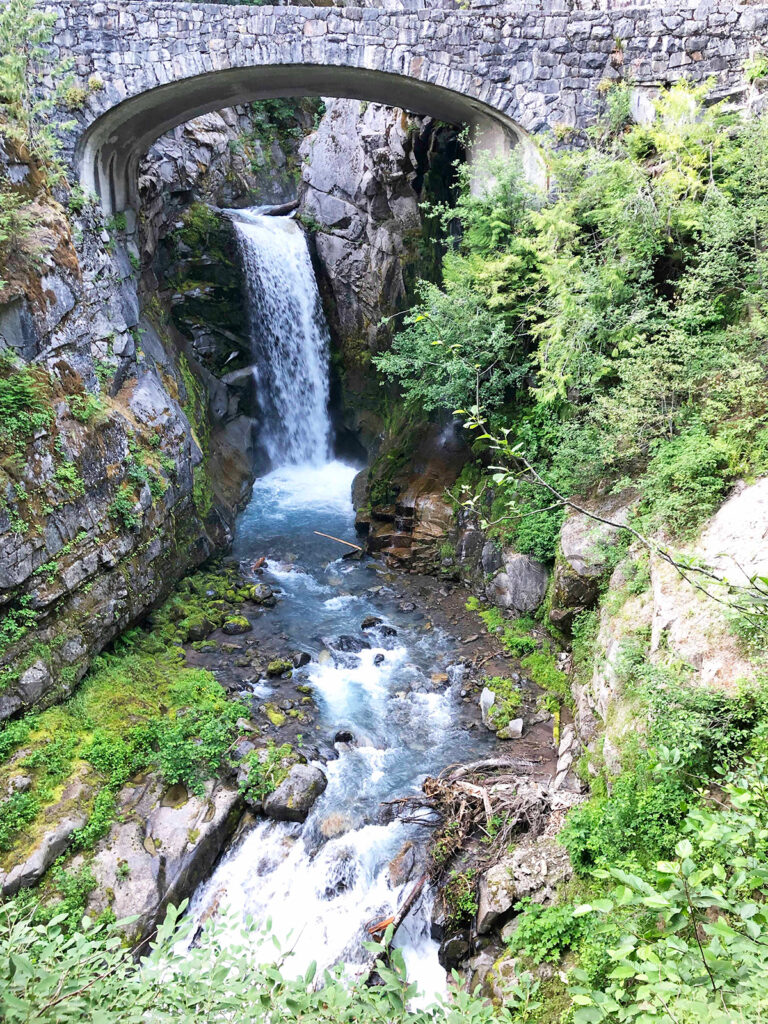
If you take the Golden Gate Trail down the mountain, you’ll shave off a bit of time and hop back on the Skyline Loop Trail at the gorgeous waterfall that’s picture worthy!
And if you’re hiking the full loop trail in early summer, you’ll pass the Sluiskin Falls. Also be sure to check out the Stevens-Van Trump Memorial, which commemorates the first climb of Mount Rainier in 1870.
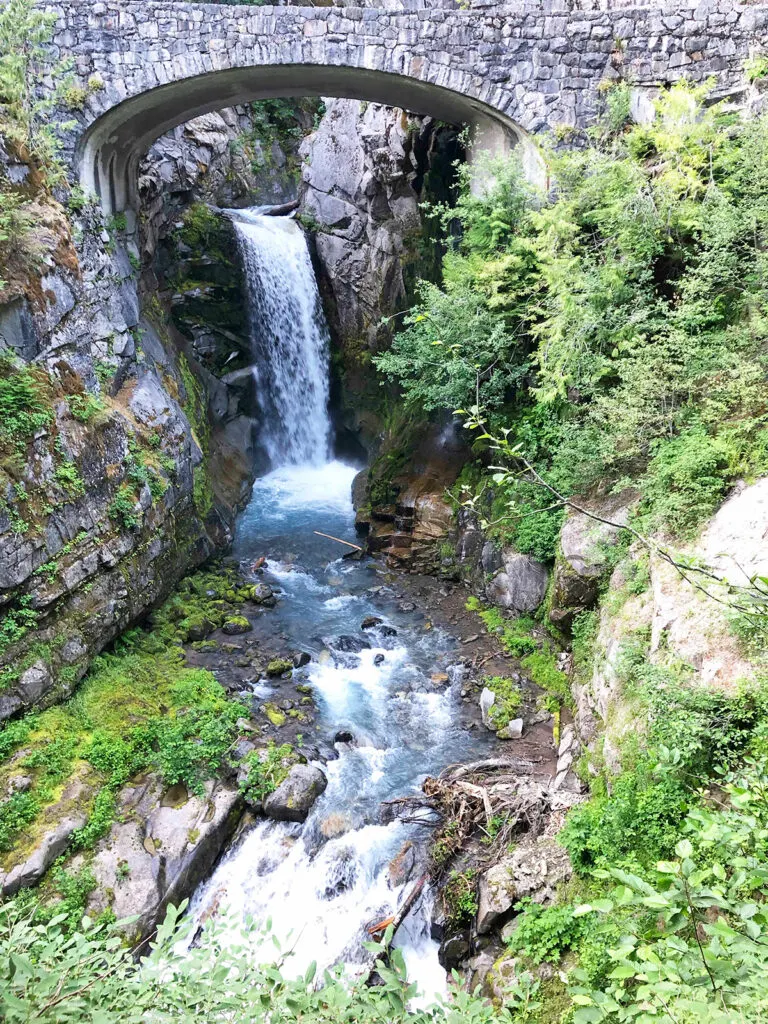
Myrtle Falls Mount Rainier

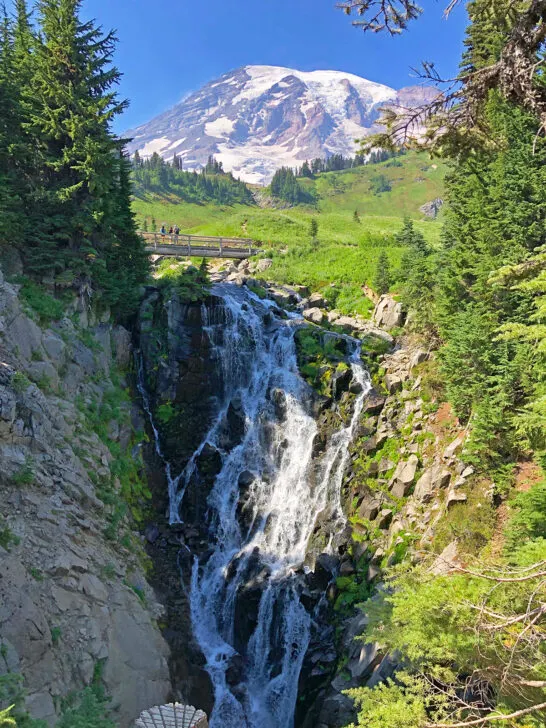
This is one of the most popular waterfalls in the hike. The picturesque bridge above the falls and Mount Rainier in the background is beautiful!
Myrtle Falls is spectacular. It’s especially beautiful if you plan your trip during peak wildflower season (late July/early August). And if you go on a sunny day, you’re blessed even more with vivid blue skies!
You can catch a view of the creek from the bridge. Or take a few steep steps down to the overlook, where you’ll see – and hear – the lush waterfall. Gorgeous!
By the time you make it to Myrtle Falls, you’ll have just .5 miles of the hike left. And bonus – it’s on pavement all the way to the trailhead and parking lot.
Wrapping up the Skyline Trail Loop

Once you’ve made it back to the trailhead, pat yourself on the back – you’ve just completed one of the most strenuous trails in the Paradise section of the park!
Now is the perfect time for more water and to refuel on protein. Or maybe check out the visitor’s center for a sandwich or ice cream. 🙂
Skyline Trail to Myrtle Falls (just the 1-mile hike)

If you’re reading this article because you’re just planning to hike the Skyline Trail to Myrtle Falls, you’ll be on pavement almost the whole time. You’ll get great photos of the falls and mountain in the background!
This is a perfect hike for those able to walk on a steep, paved incline. It’s accessible for wheelchairs or strollers up to the bridge, but not to the overlook for the falls because there are several steep steps.
At just a mile round trip, this short hike is perfect for those just wanting to spend a little time in this area. It’s a perfect hiking trail for beginners, too!
What to do near Skyline Trail Mt Rainier
While you’re in the area, be sure to explore these other prominent features nearby!
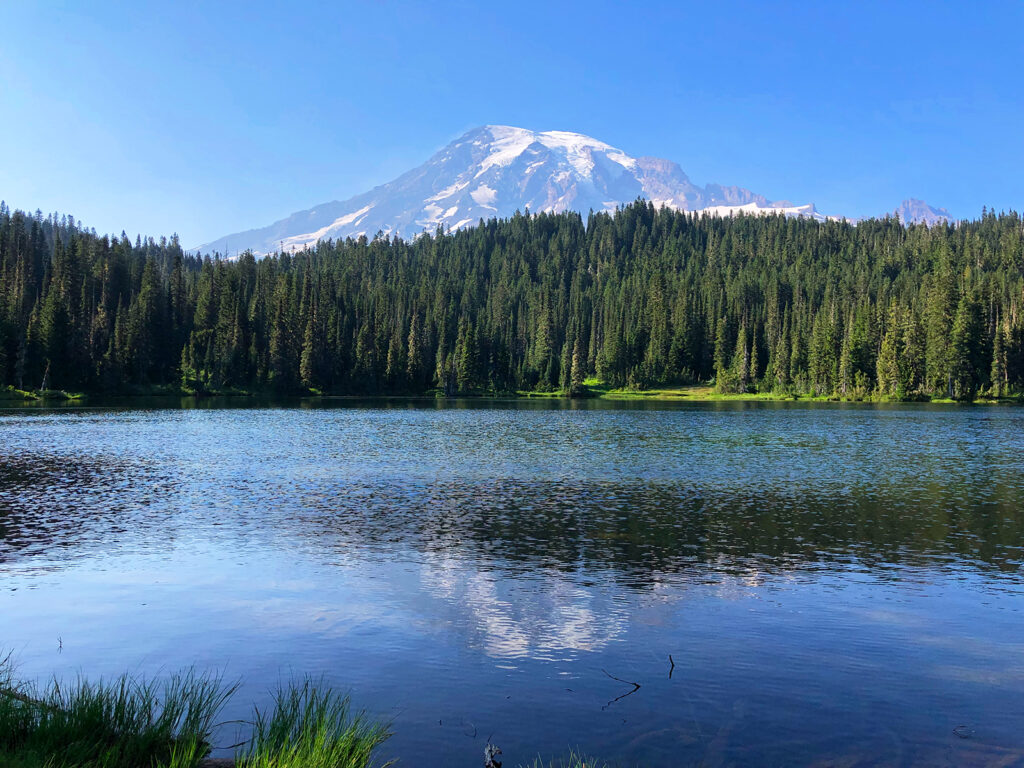
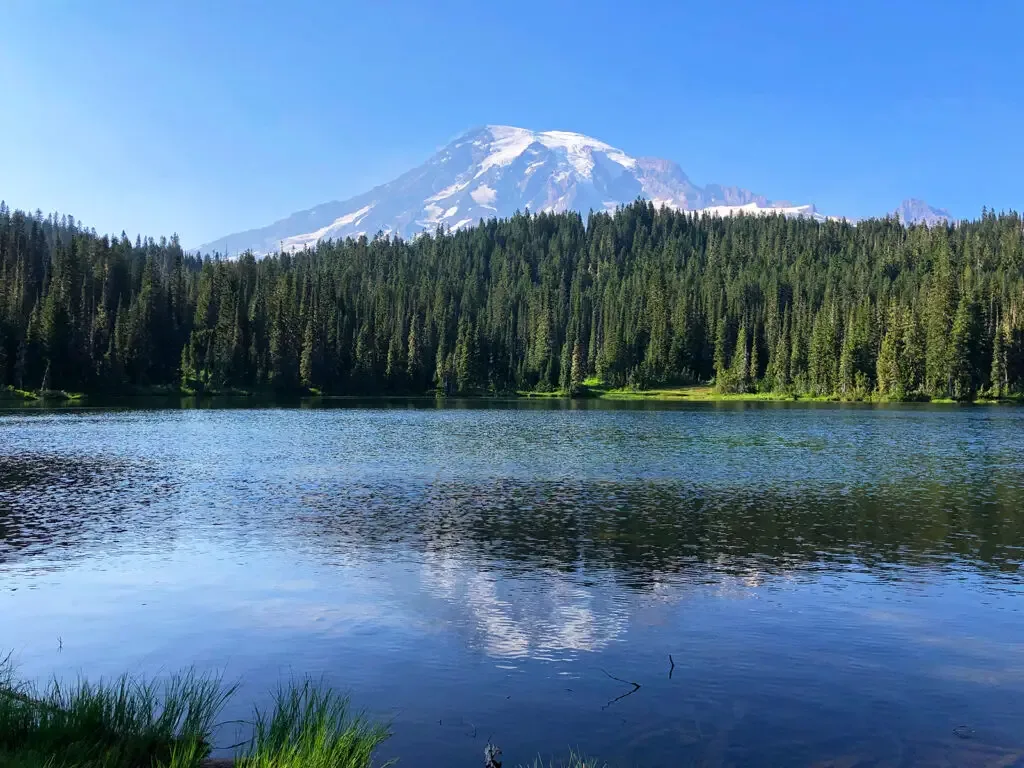
- Reflection Lakes, just east of the trailhead and Jackson Visitor Center
- Christine Falls along Paradise Road, if exiting on the southwest entrance of the park
- Box Canyon, if exiting on the southeast entrance of the park
Mt Rainier NP is full of amazing things to do. Spending a day driving on Paradise Road from west to east (or vice versa) in the summer will be a highlight of your trip. You truly won’t get bored in this amazing park!
Skyline Trail Mt Rainier – that’s a wrap!
Well, this guide for one of the best hiking trails in the park is wrapping up. It’s a hike that will leave you speechless.
Whether you’re going for the close-up views of Mount Rainier, the wildflowers, waterfalls, or the fun challenge, this trail will stick out as one of your favorites for years to come.
With so many things to do in Mt Rainier, you’ll be glad you made time for this hike!
Related content:
Paradise Mt Rainier: What to See, Do and Bring Plus Best Hikes
Bench and Snow Lake Trail: Underrated Mt Rainier Hike You Can’t Miss
22 Best Hikes in Mt Rainier: Cool Trails You’ll Love
22 Incredibly Fun Things to Do in Mt Rainier You Can’t Miss
Find this post helpful? Save it for later or share it on social media!
Cindy
Monday 28th of August 2023
Are there any spots to stop and take a dip in an Alpine Lake?
Nikki
Monday 28th of August 2023
Not along this hike. There's no lakes actually right on this trail, and the NPS doesn't want people walking off the trail to access the creeks or waterfalls. If you check out the nearby Bench and Snow Lake Trail, you can dip your feet in the lakes along this trail. Just be sure to use the public access points :) https://inspiredroutes.com/bench-and-snow-lake-trail/
Trisha Velarmino
Wednesday 16th of August 2023
Thanks for the post, Nikki! I wanted to ask if there any water sources available along the trail? I drink a lot of water and sometimes this is an issue with hiking travel! Also, how is the trail marked, and is it easy to follow? Thanks again for sharing your experience!
Nikki
Wednesday 16th of August 2023
Oh yay, so glad you're doing this trail! It's amazing. There aren't any water sources along the trail. The trailhead has a refill station (open seasonally) but nothing once you've departed from that point. I'd highly recommend bringing a 2L hydration bladder that fits in a hiking backpack. You could also bring several reusable water bottles with ice water if you don't have a backpack to accommodate a hydration system. The trail is marked really well, and depending on when you hike it likely there will be plenty of people to follow. If you go super early and there's not a lot of people out yet, follow the cairns. But it's so heavily trafficked that the trail is pretty easy to see. Have fun!!
Claire | The Detour Effect
Thursday 10th of August 2023
I still have never made it to Mt Rainier, maybe something I need to start planning for next summer (or maybe I can still fit it in this year since you said September is still good...hmmm...). Is it really buggy? I always go back and forth about whether I prefer the July/August timeframes for the wildflowers and rushing waterfalls, or the shoulder seasons because of avoiding bugs and people.
Nikki
Friday 11th of August 2023
Oh Claire you make a good point! If you plan right the crowds aren't too much of a nuisance. I didn't find Mt Rainier overly buggy compared to some other mountainous regions I've visited. But honestly, I think anytime where the trails are clear for hiking would be a fun trip to Mt Rainier!
Kim
Wednesday 9th of August 2023
You have such stunning photos of this picturesque area along the Skyline Trail. I would love to walk it one day if I get up there, as it seems like my type of walk in nature.
Nikki
Friday 11th of August 2023
Very cool, Kim. It's a beautiful spot in the country, and perfect for hiking, especially during summertime.
gloria li
Wednesday 9th of August 2023
wow it's really stunning especially with all the blooms. I would love to go to Mt. Rainier at some point
Nikki
Friday 11th of August 2023
Yay Gloria! I hope you get there soon!!